Moisture control for RVs means blocking leaks, boosting ventilation, and managing humidity every day.
I’ve helped dozens of RV owners beat mold, rot, and fogged windows. In this guide, I’ll break down moisture control for RVs in plain language. You’ll get pro tips, real-world fixes, and a simple plan you can use today. If you care about comfort, air quality, and resale value, moisture control for RVs is your best friend.
What Causes Moisture in an RV
RVs are small spaces. Water builds up fast. Every breath, shower, and pot of boiling water adds moisture. Even damp gear adds to it.
Common sources include:
- Cooking and shower steam
- Breathing and pets
- Wet towels, rugs, and bedding
- Hidden leaks in roofs, windows, and slide-outs
- Cold weather condensation on windows and walls
Warm air holds more moisture than cold air. When warm, moist air hits a cold surface, it condenses. That’s why you see water on windows. This is the heart of moisture control for RVs. Manage the air. Protect the surfaces. Keep water out.

Why Moisture Control Matters
Moisture feeds mold, which can harm your lungs. It also wrecks wood, floors, and insulation. Wiring and electronics can corrode. Smells linger. Soft spots spread.
Strong moisture control for RVs protects:
- Health and air quality
- Structural parts like subfloors and wall studs
- Insulation performance and warmth
- Resale value and buyer confidence
Simple changes go a long way. A dry RV feels warmer, cleaner, and safer.

A Simple Game Plan: Daily, Weekly, Seasonal
Moisture control for RVs works best with a routine. Keep it light and repeatable.
Daily
- Run vent fans during cooking and showers
- Wipe window condensation each morning
- Crack a window near the bed at night if safe
- Hang wet gear outside or in the shower with fan on
Weekly
- Wash and dry towels, rugs, and bedding fully
- Inspect window tracks and door seals
- Empty and clean dehumidifier tanks
Seasonal
- Reseal roof seams and around roof fixtures
- Check slide-out seals and weep holes
- Clean vent fans and filters

Tools That Work: Dehumidifiers, Vent Fans, Absorbers
You have options. Mix and match based on your climate and power setup. This is where moisture control for RVs pays off fast.
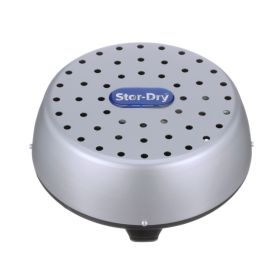
Electric dehumidifiers
- Best for full-time living and wet climates
- Look for small units rated 20–35 pints per day for most rigs
- Place near living areas, not crammed into cabinets
Vent fans
- A powered roof fan moves moisture out at the source
- Use during showers and cooking
- Create cross-breeze by cracking a window
Desiccants and moisture absorbers
- Good for storage and boondocking
- Use in closets, under the bed, and near the front cap
- Replace or recharge as directed
Smart tip: A mix of a small dehumidifier plus active venting is the backbone of moisture control for RVs in most seasons.

Ventilation Done Right
Airflow is cheap and powerful. Use it well.
- Run the bathroom fan the whole shower and 15 minutes after
- Use the kitchen fan and lids when cooking
- Crack a window on the opposite side to create a breeze
- Avoid drying laundry inside without fans
In winter, you can still vent. Run the fan on low and only a window crack. You will lose a little heat, but moisture control for RVs is worth it. Less moisture means you feel warmer.
Insulation, Heating, and Airflow
Cold surfaces condense water. Reduce cold spots and you reduce wet spots.
- Add thermal window covers or insulated curtains
- Use vent cushions in ceiling vents at night
- Keep cabinet doors open near exterior walls to improve air flow
- Avoid pushing furniture hard against outside walls
A small, steady heat source helps. Space heaters or the furnace can keep surfaces warm. That limits condensation. Pair gentle heat with ventilation. That combo is core to moisture control for RVs.

Leak Prevention and Water Intrusion
One tiny leak can soak a wall for months. Check often.
- Inspect the roof 3–4 times per year
- Reseal cracked lap sealant around vents and antennas
- Clean and wax fiberglass to shed water better
- Maintain slide-out toppers and bulb seals
- Clear window weep holes so water drains out
If you suspect a leak, test with a moisture meter or a gentle hose spray. Fast fixes save thousands. Leak control is the backbone of moisture control for RVs.

Storage and Off-Season Strategy
RVs in storage still breathe. Moisture moves. Plan for it.
- Clean, dry, and vent before storing
- Use desiccants in closets, under beds, and compartments
- Prop fridge and cabinet doors open
- Avoid airtight covers that trap moisture; use breathable covers
- If you can, run a small dehumidifier on a timer
These small steps protect fabrics, wood, and electronics. Off-season moisture control for RVs makes spring open-up easy.

Monitoring Humidity and Mold Checks
You cannot manage what you do not measure.
- Place a digital hygrometer inside and in the pass-through
- Aim for 40–55% relative humidity
- Use an IR thermometer to spot cold surfaces
- Use a moisture meter on suspect walls and floors
Smell is a clue. A musty odor means hidden moisture. Early checks help you keep moisture control for RVs on track.
Troubleshooting Common Problems
Musty smell after rain
- Dry the rig with heat and ventilation
- Inspect roof seams and window corners
Water on windows each morning
- Vent at night, add insulated shades
- Run a small dehumidifier on low
Soft spots near the bathroom
- Check toilet seals and shower pan
- Inspect floor from underneath if possible
Fogged dual-pane windows
- Use a temporary condensation squeegee
- Plan for repair or replacement when you can
Damp storage compartments
- Clear weep holes and add desiccants
- Vent the bay with a small grill or fan
This quick approach keeps moisture control for RVs practical and simple.
Budget vs Premium: What To Buy First
Start small, upgrade as needed. Spend where it counts.
Good on a budget
- Digital hygrometer for each zone
- Desiccants for closets and storage
- Vent cushions and insulated curtains
- Butyl tape and lap sealant for repairs
Premium upgrades
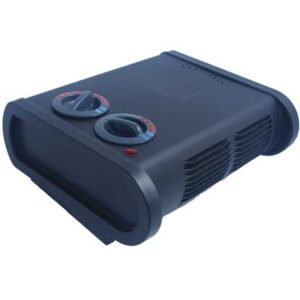
- High-flow roof fan with thermostat and rain cover
- 20–35 pint Energy Star dehumidifier
- Dual-pane window repair or upgrades
- Smart humidity sensors with app alerts
If you can only buy one item, get a quality vent fan. It’s the best first step in moisture control for RVs.
Real-World Lessons From the Road
When I first lived in a fifth wheel, I woke up to soaked windows. I wiped glass every day and still smelled mildew. My mistake was skipping night ventilation. One cracked window plus the bathroom fan on low fixed it.
I once chased a “roof leak” for weeks. It was a clogged window weep hole. A quick clean and the wall dried out. Lesson learned: simple checks win. Small habits build strong moisture control for RVs.
In cold snaps, I use a space heater on low, vent cushions in the vents, and the fan on a timer. My humidity stays below 50%, and my walls stay dry. It’s not fancy. It just works.
Frequently Asked Questions of moisture control for RVs
What is the ideal humidity level inside an RV?
Aim for 40–55% relative humidity. This range keeps mold at bay and still feels comfortable.
Do I need a dehumidifier if I have good vent fans?
Fans remove moisture at the source. A dehumidifier helps when it’s cold or very damp, or when you can’t vent enough.
How do I stop condensation on RV windows?
Add insulated shades, run a vent fan, and crack a window. Keep interior humidity near 45% if possible.
Can indoor plants cause moisture problems?
A few plants are fine. Many plants or large, wet soil surfaces can raise indoor humidity.
How often should I reseal my RV roof?
Inspect every season and reseal as needed. Many owners do touch-ups two to four times per year.
Conclusion
Keeping an RV dry is simple when you make it a habit. Vent during steam, warm cold surfaces, seal leaks fast, and measure humidity. With a few tools and steady routines, moisture control for RVs protects your health, comfort, and investment.
Try one change today. Run your fan during showers and wipe windows in the morning. If this helped, subscribe for more tips, ask a question, or share your own moisture control win.