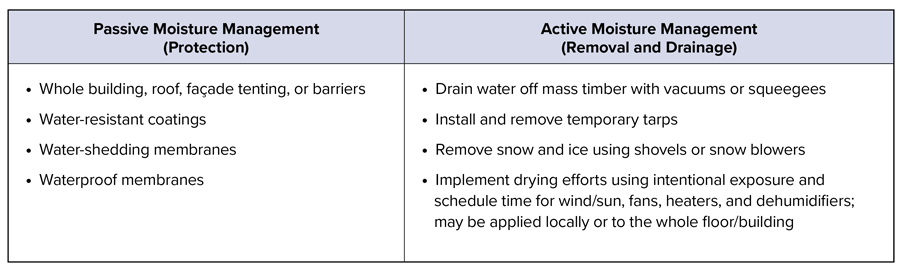
Passive uses design to shed moisture; active uses powered systems to remove it.
If you are weighing passive vs active moisture control, you are in the right place. I have helped homeowners, builders, and facility teams choose the right mix for years. In this guide, I break down the science, the costs, and the steps. You will learn how passive vs active moisture control works, where each shines, and how to avoid common mistakes.
Moisture 101: Why It Matters
Moisture is sneaky. It rides in with rain. It flows by capillary action through tiny pores. It floats in air as vapor and condenses on cool spots. Left unchecked, it feeds mold, ruins finishes, and weakens structure.
A dry building lasts longer and feels better. It saves energy and limits health risks. The right mix of controls keeps humidity in check and protects your investment.
Key moisture sources to watch:
- Bulk water like rain, leaks, and floods.
- Air leaks that carry moist air into walls and attics.
- Vapor diffusion through paint, drywall, or sheathing.
- Indoor sources like baths, cooking, and people.
The core idea is simple. Guide water away. Keep surfaces warm and dry. Vent and dehumidify when needed. That is the heart of passive vs active moisture control.

What Is Passive Moisture Control?
Passive control uses design and materials to manage water without power. It does not need fans, pumps, or complex controls. It sets the rules so water has nowhere to hide and little chance to linger.
Core passive strategies:
- Site and drainage. Slope soil away. Use gutters and downspouts with long splash blocks.
- Roof and cladding design. Use overhangs and rainscreens so walls can drain and dry.
- Weather barriers. Install a continuous water-resistive barrier and flashing at all openings.
- Capillary breaks. Use sill gaskets, and break direct contact between wet concrete and wood.
- Air sealing. Stop humid air from sneaking into cool spaces where it can condense.
- Smart vapor control. Choose the right vapor retarder class and let assemblies dry to the safe side.
- Thermal control. Add exterior insulation to keep surfaces above dew point.
Pros:
- Low energy use and fewer moving parts.
- Works 24/7 once built right.
- Often the lowest life-cycle cost.
Cons:
- Needs careful design and great craftsmanship.
- Can struggle in extreme seasons or during high internal loads.
- Harder to fix once walls are closed.
When I audit homes, strong passive details fix 80% of moisture issues before a single device turns on. That is a big win in the passive vs active moisture control conversation.

What Is Active Moisture Control?
Active control uses powered systems to remove moisture or to control airflow. You switch it on. It responds and adapts. It is about precision and speed.
Common active tools:
- Dehumidifiers that pull water from indoor air.
- HVAC with good latent capacity to manage humidity while cooling.
- Energy or heat recovery ventilators that bring in fresh air with smart moisture exchange.
- Exhaust fans for baths, kitchens, and crawl spaces with timers or sensors.
- Sump pumps for ground water and foundation leaks.
- Smart sensors and controls that target a set humidity range.
Pros:
- Precise control of indoor relative humidity.
- Helps during storms, large gatherings, or shoulder seasons.
- Offers data for tuning and alerts for issues.
Cons:
- Uses energy and needs maintenance.
- Can mask design flaws if used as a crutch.
- Upfront cost and ongoing service.
In facilities I manage, a small whole-home dehumidifier often stabilizes summer humidity fast. It shines when passive vs active moisture control must handle spikes or tricky climates.

Passive vs Active Moisture Control: Side-by-Side Comparison
Choosing between these paths is not either-or. A smart plan blends both. Use passive first. Add active where risk remains.
How they compare:
- Energy use. Passive is near zero. Active draws power.
- Precision. Active wins for tight humidity bands. Passive offers steady background control.
- Cost. Passive adds less to bills once built. Active needs purchase and upkeep.
- Resilience. Passive works in outages. Active stops when the power goes out.
- Climate fit. Passive depends on design and materials. Active bridges seasonal gaps.
- Maintenance. Passive needs inspections. Active needs filters, cleaning, and calibration.
- Noise and comfort. Passive is silent. Active can add fan noise if not sized right.
In most projects, I start with rain control, air sealing, and insulation. Then I add a small dehumidifier and balanced ventilation. That blend nails the goals of passive vs active moisture control while keeping costs in check.
Climate Considerations and Codes
Climate shapes the plan. One size does not fit all.
Simple rules:
- Hot-humid. Focus on airtightness, shade, and dehumidification. Let walls dry to the inside. Avoid interior poly unless the design proves safe.
- Mixed-humid. Use balanced ventilation and smart vapor control. Watch spring and fall when cooling is off but humidity is high.
- Cold. Keep interiors airtight and warm. Let walls dry to the outside. Control indoor humidity to prevent window condensation.
- Marine. Protect from wind-driven rain with a vented rainscreen and robust flashing.
- Arid. Manage bulk water and dust. Beware of rare storms and night cooling that can condense moisture.
Follow current building guidance on vapor retarders, ventilation rates, and dew point checks. Look for standards that cover moisture design and acceptable indoor humidity. These set safe ranges and offer proven methods to test assemblies over the year.
If you model your design, test winter and summer cases. Check if surfaces stay above dew point. This is a key step in passive vs active moisture control.
How to Choose: A Simple Decision Framework
Use this quick path to decide:
- Define goals. Protect structure, improve health, or boost comfort.
- Map risks. Note rain exposure, soil type, basement, crawl space, and roof form.
- Audit the envelope. Check drainage, flashing, air leaks, and insulation.
- Measure humidity. Track indoor RH and dew point for two weeks in each season.
- Fix the big leaks first. Roofs, walls, and ground water.
- Add active tools. Size dehumidifiers and ventilation after passive upgrades.
- Plan maintenance. Set calendar tasks and assign roles.
By following these steps, you build a solid plan for passive vs active moisture control that lasts.
Real-World Lessons From the Field
A coastal client had musty rooms each spring. The walls had no capillary breaks, and the bath fan did not vent outside. We added a sill gasket, flashed the cladding right, and installed a quiet, timed bath fan. A small dehumidifier handled the shoulder season. Odors vanished in a week.
In a cold-climate retrofit, interior poly caused summer condensation when the AC ran. We swapped in a smart vapor retarder and added exterior insulation. A balanced ventilator kept fresh air steady. This passive vs active moisture control mix stopped paint blisters and kept windows clear.
In a warehouse, roof leaks hid under insulation. Teams kept lowering humidity with larger units. The bill soared. We fixed the roof and added gutters. The old dehumidifier ran half as much. That was a teachable moment.
Installation and Maintenance Best Practices
Good gear will fail if installed wrong. Simple details matter.
Best practices:
- Dehumidifiers. Place near drains. Use short, smooth ducts. Set RH to 45 to 55 percent.
- Ventilation. Balance supply and exhaust. Seal ducts with mastic. Commission with a flow hood.
- Bath and kitchen fans. Duct outside. Use timers or humidity controls. Clean covers twice a year.
- Crawl spaces. Seal soil with a durable liner. Add a capillary break and insulate rim joists.
- Roof and walls. Flash every penetration. Leave a rainscreen gap to vent and drain.
- Monitoring. Place sensors on the coldest surfaces and in problem rooms. Log data.
These steps strengthen passive vs active moisture control and protect your budget.
Common Mistakes and How to Avoid Them
Avoid these traps:
- Running bigger AC to fight humidity. It cools fast but leaves air wet. Add latent capacity or a dehumidifier instead.
- Trapping moisture with wrong vapor layers. Let assemblies dry to at least one side.
- Skipping air sealing. Air carries more moisture than diffusion. Seal first.
- Venting fans into attics or crawl spaces. Always vent outside.
- Ignoring maintenance. Dirty filters and clogged drains undo your plan.
When in doubt, test, measure, and adjust. That is the core of smart passive vs active moisture control.
Budget and ROI: What to Expect
Costs vary by building size and climate. But patterns are clear.
Where the money goes:
- Passive upgrades. Flashing, rainscreens, and exterior insulation cost upfront but save energy and reduce repairs.
- Active systems. Quality dehumidifiers and balanced ventilation add comfort and protect finishes.
- Monitoring. A few reliable sensors help fine-tune settings and prevent damage.
Typical gains:
- Lower mold risk and fewer callbacks.
- Less wear on AC equipment.
- Better comfort at higher thermostat setpoints.
I see fast payback when fixing leaks and air sealing. Active gear often pays back by preventing damage in high-risk spaces. That is a strong case for balanced passive vs active moisture control.
Tools, Sensors, and Monitoring
You cannot manage what you do not measure. Start simple.
What to track:
- Indoor RH target of 40 to 50 percent in most seasons.
- Dew point near 50 to 55°F to avoid window sweat.
- Surface temps in basements and on north walls.
- Ventilation flow rates and filter status.
Use alerts when RH drifts for more than a day. Pair data with a quick walk-through. Check drains, filters, and fan flow. These habits keep passive vs active moisture control on track.
Frequently Asked Questions of passive vs active moisture control
What is the main difference between passive and active moisture control?
Passive relies on design and materials to drain and dry without power. Active uses devices like dehumidifiers and fans to remove moisture on demand.
Do I need both passive and active systems?
Most buildings benefit from a mix. Use passive first to stop water and air leaks, then add active tools for precision.
What indoor humidity should I aim for?
A range of 40 to 50 percent works well in most climates. Stay below 60 percent to reduce mold risk.
Can HVAC alone manage humidity?
Sometimes, but not always. Many systems are sized for temperature, not moisture, so a dehumidifier may still be needed.
How often should I service dehumidifiers and fans?
Check filters every one to three months and clean coils and drains twice a year. Verify airflow and setpoints each season.
Will more insulation help with moisture?
Yes, if placed right. Exterior insulation keeps surfaces warm and reduces condensation risks.
Are smart sensors worth it?
Yes. Sensors alert you before damage occurs and help tune settings to save energy and improve comfort.
Conclusion
Dry buildings are not an accident. They are the result of smart design, careful work, and steady checks. Lead with robust passive details. Add active gear for control and peace of mind. That is the best path for passive vs active moisture control in homes and commercial spaces.
Start today. Walk your property after a rain, seal the big leaks, and set humidity alerts. If you want more tips on passive vs active moisture control, subscribe or leave a question. I am here to help.