Place moisture absorbers near damp hotspots with open airflow, off the floor, never blocked.
Getting the optimal placement for moisture absorbers can make or break your results. I’ve installed hundreds in homes, boats, and storage rooms. When placed well, they pull water fast and keep mold at bay. When placed wrong, they barely work. In this guide, I’ll show you the optimal placement for moisture absorbers with clear rules, real tests, and room-by-room tips. You’ll get simple steps you can use today.
How moisture absorbers work (and why placement matters)
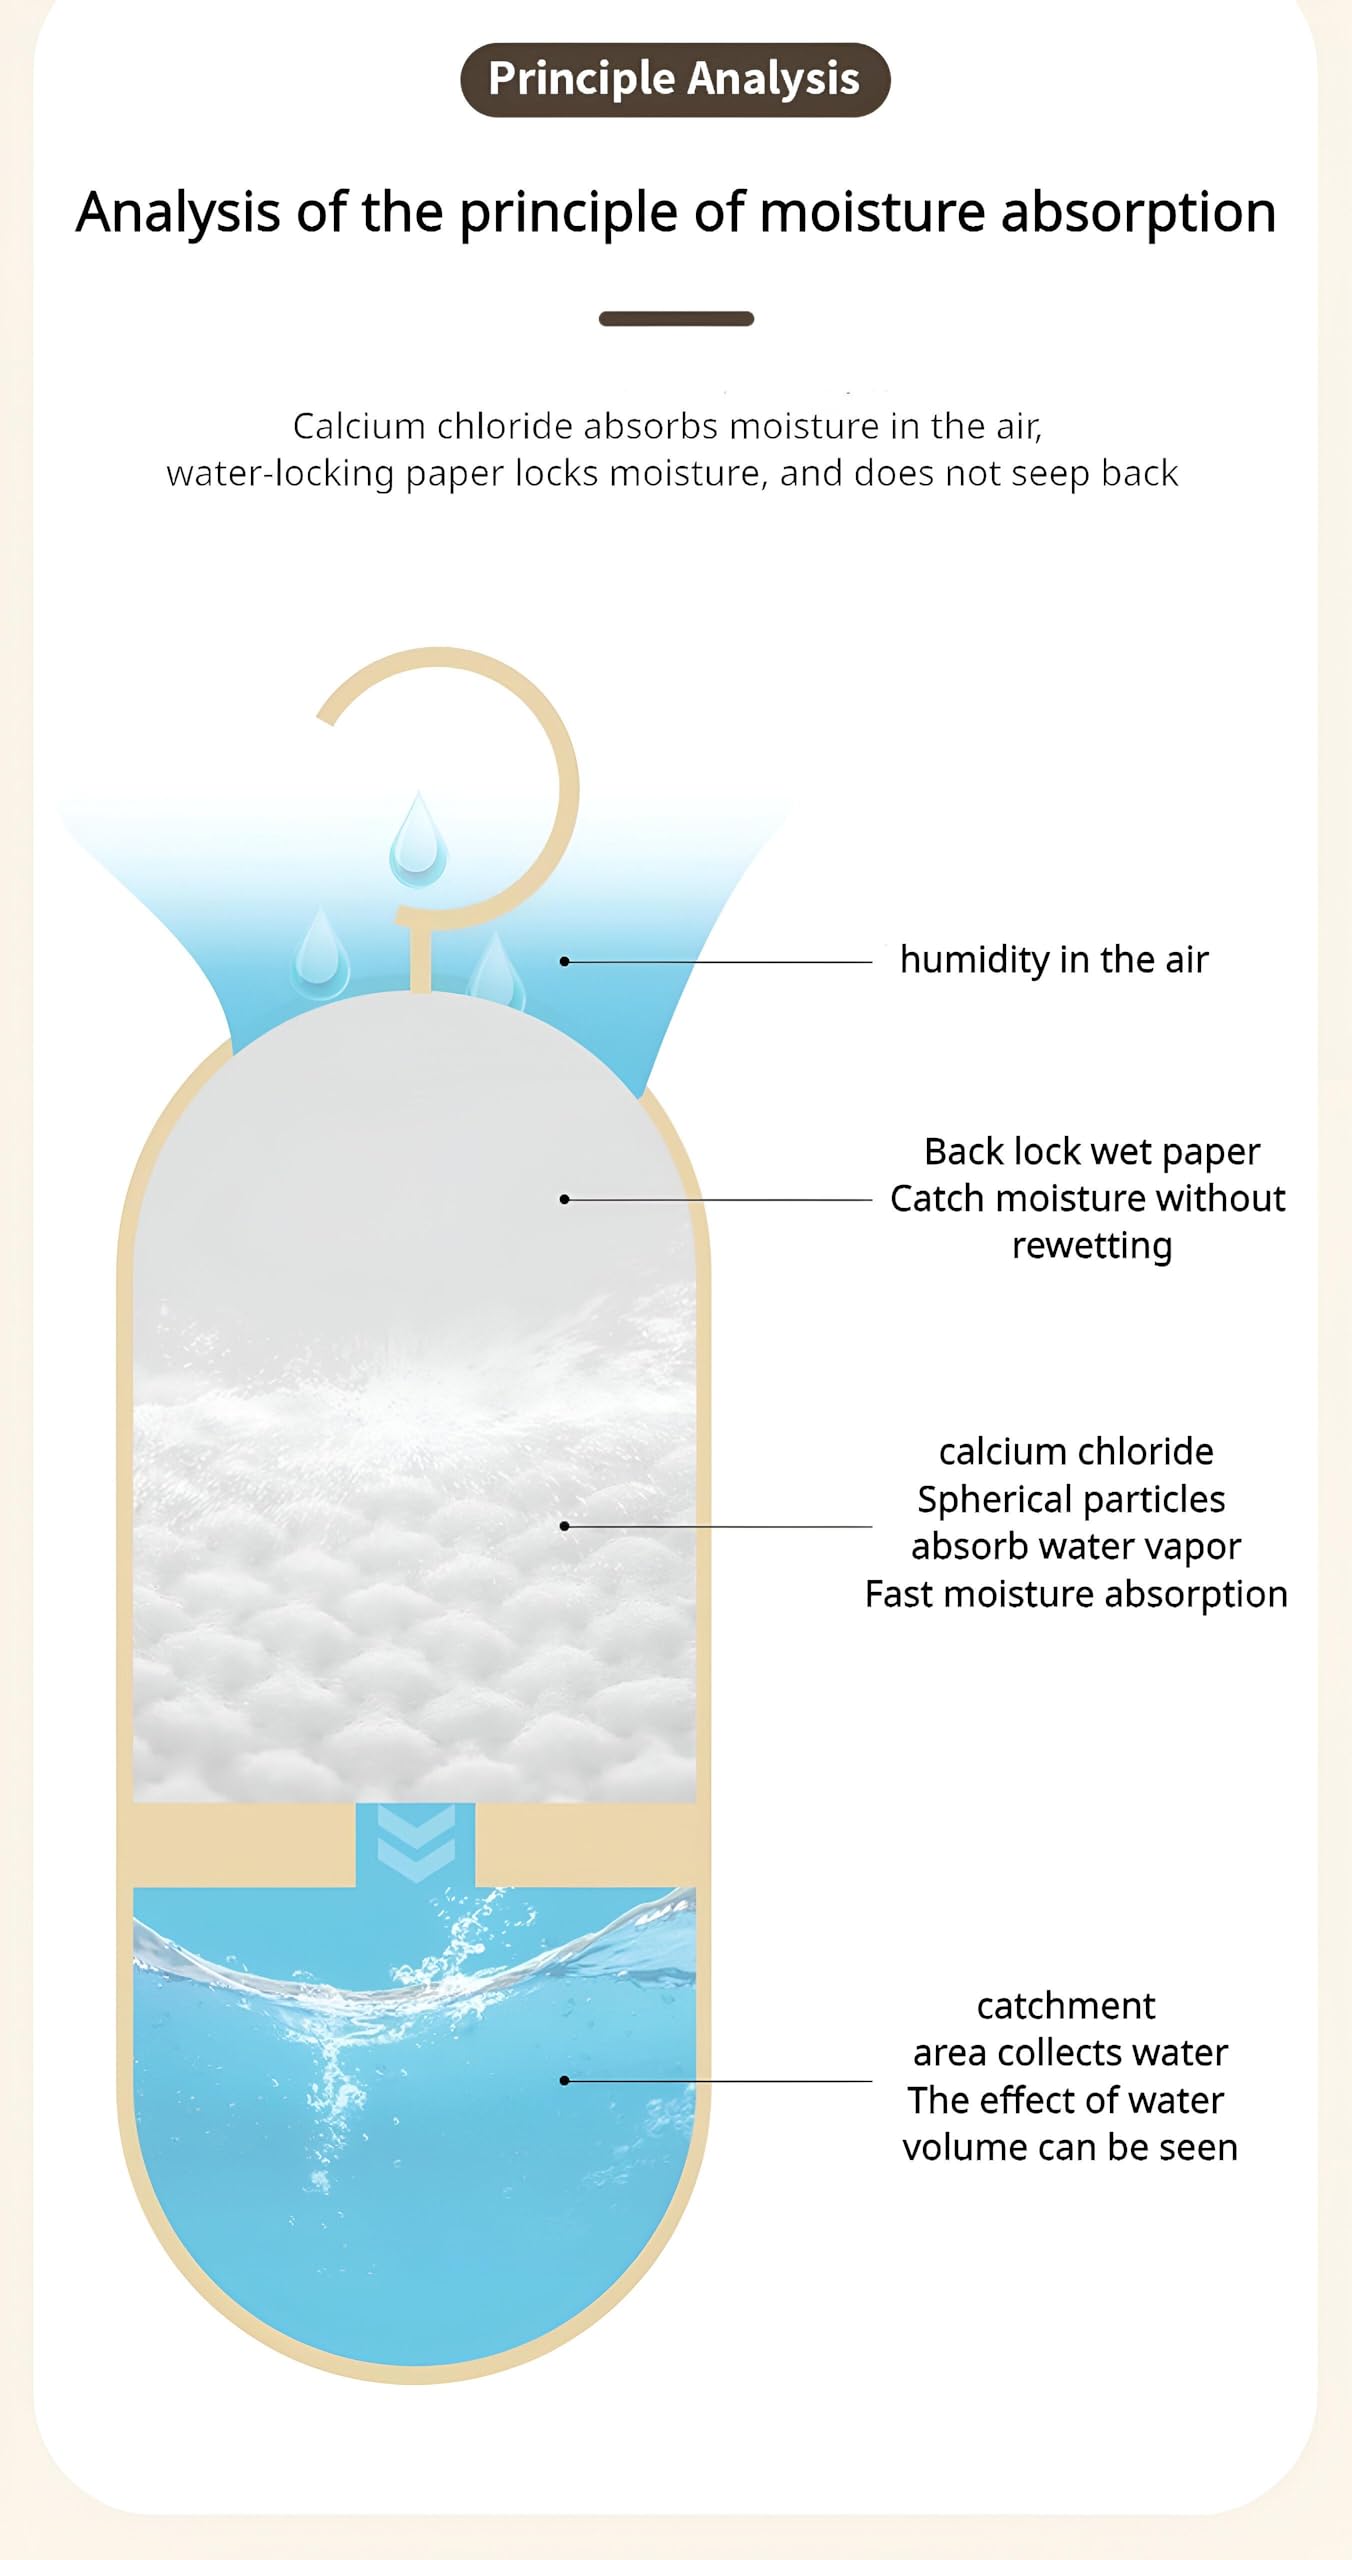
Moisture absorbers pull water from the air. They do this by adsorption or by turning salts into liquid brine. Silica gel and clay absorb. Calcium chloride dissolves as it draws in water. All types need air to move around them.
Placement matters because air flow drives how fast they work. Damps spots form near cold walls, closed corners, and tight spaces. Put the unit where wet air gathers and can reach it. Keep space around it so air can circulate.
In my basement tests, two units 6 feet apart gave very different results. The one wedged behind boxes stayed dry. The one near the cold wall filled up fast. Small changes in placement can double performance.

Core rules for optimal placement
Follow these rules for the optimal placement for moisture absorbers in any space.
- Put it close to the damp source. Under sinks, by exterior walls, or near a drafty window.
- Keep it off the floor by 2 to 6 inches if it can spill. Use a tray or a shelf.
- Allow airflow on all sides. Aim for 4 inches of clearance.
- Avoid heat vents and direct sun. Warm air can drive off water and skew results.
- Do not hide it behind dense items. Air must reach it with ease.
- Use more than one unit for large rooms or split zones.
- Place low in closets and cabinets. Moist air pools in tight, low spots there.
- Keep it away from pets and kids. Many salts can irritate skin.
These simple steps cover 80% of cases. They are the backbone of the optimal placement for moisture absorbers in homes, garages, and RVs.

Room-by-room placement guide
Use these tips to dial in the optimal placement for moisture absorbers in each area.
Closets and wardrobes
- Place one unit low, near the back wall.
- Add a small bag on the top shelf for balance.
- Do not block vents or door gaps.
Bathrooms
- Set it near the shower wall or under the vanity.
- Keep it away from splashes but close to steam paths.
- Leave the door cracked for airflow.
Kitchens and pantries
- Place one under the sink near the trap.
- Add a small unit near the fridge’s rear wall.
- Keep it clear of cooking heat and open flames.
Basements and crawl spaces
- Put units near cold walls and corners.
- Use a stable tray to avoid spills.
- Spread multiple units every 8 to 12 feet.
Garages and sheds
- Place near doors where air drafts enter.
- Add one near stored tools or near a workbench wall.
- Keep it off bare concrete to avoid wicking.
Attics and lofts
- Set near roof valleys or around vent stacks.
- Keep space around insulation. Do not bury units.
- Use hanging bags to save floor space.
RVs, boats, and storage units
- Put one in the galley or head area.
- Add small bags in lockers and under berths.
- Spread units to cover front and rear zones.

Micro-locations that make a big difference
The optimal placement for moisture absorbers often comes down to inches, not feet.
Behind large furniture
- Tuck a small unit behind a sofa or dresser against an exterior wall.
- Keep at least a hand’s width gap for airflow.
Under sinks and vanities
- Place close to the back wall and P-trap.
- Use a spill tray and check often.
Window bays and sills
- Set a compact unit near cold glass.
- Avoid direct sun on indicator crystals.
Laundry nooks
- Place near the washer side panel or vent area.
- Keep clear of lint build-up.
Safe with electronics and valuables
- Use silica gel near gear, cameras, and instruments.
- Do not place brine-forming salts above equipment.

Sizing, capacity, and how many to use
The optimal placement for moisture absorbers depends on size too. Right size equals steady results. Wrong size means slow change.
Use these quick rules:
- Small, tight spaces under 50 sq ft: 50 to 150 grams silica gel.
- Mid rooms 50 to 150 sq ft: one calcium chloride tub or two small bags.
- Large rooms 150 to 300 sq ft: two to three medium tubs spaced apart.
- Very damp zones: consider a powered dehumidifier plus passive units.
A simple way to plan:
- Start with one unit per 100 sq ft.
- Add one more for each wet source or cold wall.
- After one week, check fill rate. If more than half full, add a second unit.
Manufacturers publish absorption rates under standard lab settings. Real rooms vary a lot. Use those numbers as a guide, not a promise.
Monitoring, maintenance, and safety
Good placement starts strong. Good upkeep keeps it strong. Make it a quick habit.
Try this easy routine:
- Check fill level weekly for the first month.
- Replace calcium chloride when liquid nears the max line.
- Recharge silica gel when color changes to “wet.”
Safety basics:
- Keep units on trays if they can leak.
- Store refills in sealed tubs, away from kids and pets.
- Do not mix different chemicals in one container.
Pro tip from field work: label each unit with date and location. You will learn which spots need more help. That speeds up the optimal placement for moisture absorbers over time.

Seasonal and climate tips
Weather shifts change where water shows up. Adjust your setup with the seasons.
In humid summers:
- Focus on basements, bathrooms, and first-floor closets.
- Place units near cold surfaces where condensation forms.
In winter:
- Watch window bays and exterior wall corners.
- Move units away from heaters and registers.
In coastal or rainy regions:
- Increase unit count and check more often.
- Pair with a small fan or cracked door to boost flow.

Common mistakes and easy fixes
Even a small mistake can cut performance in half. Here is how to avoid them.
Mistakes to avoid:
- Hiding units behind piles or inside sealed bins.
- Placing right under leaks or active drips.
- Setting next to heaters or direct sun.
- Using too few units for large rooms.
Fast fixes:
- Move each unit 6 to 12 inches into open air.
- Add a tray and raise it off the floor.
- Split one big tub into two smaller ones across the room.
- Add a fan on low to improve air pass-through.
These tweaks often unlock the optimal placement for moisture absorbers without buying more gear.
Quick placement checklist
Use this as your five-minute setup guide.
- Identify the damp source and cold spots first.
- Place units near those spots with 4 inches of clearance.
- Keep off the floor if spill risk exists.
- Spread units to cover separate zones in large rooms.
- Label, log, and recheck weekly at the start.
Do this once, and the optimal placement for moisture absorbers becomes fast and repeatable.
Frequently Asked Questions of optimal placement for moisture absorbers
Where should I place a moisture absorber in a closet?
Put it low and near the back wall. Add a second small bag on the top shelf if the closet feels very damp.
Can I place moisture absorbers on the floor?
You can, but use a tray. If the product can leak, raise it 2 to 6 inches to avoid floor damage.
How many moisture absorbers do I need for a bedroom?
Start with one per 100 sq ft, near the coldest wall. If it fills fast, add a second on the opposite side.
Do moisture absorbers work better high or low?
In tight spaces like closets, low works well. In rooms, focus on the damp source and airflow more than height.
Is it safe to place absorbers near electronics?
Use silica gel or sealed canisters near electronics. Avoid calcium chloride tubs above or beside valuable gear due to spill risk.
How far from walls should I place them?
Leave about 4 inches around the unit. This gap allows air to reach the desiccant from all sides.
Can I hide moisture absorbers behind furniture?
Yes, if there is airflow. Keep at least a hand’s width gap and avoid dense piles that block air.
Conclusion
Good placement is the secret sauce that makes simple products work hard. Find the damp source, give the unit air, and check it often. With the optimal placement for moisture absorbers, you can cut odors, protect gear, and prevent mold.
Try the checklist in your most humid room today. Move one unit, log the result, and tune the setup next week. Want more how-to guides like this? Subscribe, share your results, or drop a question in the comments.