Moisture control in cold climates means balancing humidity, sealing leaks, and managing vapor.
If winter brings fogged windows, musty smells, or surprise ice dams, you’re in the right place. I’ve spent years fixing homes where cold weather turns small moisture issues into big repairs. In this guide, we’ll unpack moisture control in cold climates step by step, with tips you can use today and deeper insights when you’re ready to plan upgrades.
Why moisture behaves differently in cold climates
Moisture control in cold climates starts with vapor drive and temperature. Warm air holds more moisture. When that warm, moist air meets a cold surface, it drops water. That is condensation. In winter, the drive is from inside to outside, which pushes moisture into walls and attics.
Think of your home like a sweater and a windbreaker. Insulation is the sweater. Air and vapor control layers are the windbreaker. Without both, heat and moisture move in the wrong places.
Key ideas to remember:
- Dew point is the temperature where air gives up water. Cold surfaces hit dew point fast.
- Stack effect moves warm air up and out through leaks, pulling moist air from below.
- Air leaks move more moisture than diffusion through materials.
In practice, that means a small gap around a light can can carry more water vapor than a full wall can pass by diffusion all day. That is why air sealing matters so much for moisture control in cold climates.
Common sources of moisture in cold homes
Moisture control in cold climates fails when sources pile up indoors. Everyday life adds a lot of water to air.
Typical sources:
- People breathe and sweat. A family of four adds pints of water each day.
- Cooking, boiling water, and dishwashers release steam.
- Showers and baths add bursts of humidity.
- Wet basements and crawl spaces evaporate into living areas.
- Firewood stored inside dries and releases moisture.
- New construction materials contain “built-in” moisture that takes months to dry.
Watch for warning signs:
- Window condensation or ice at the edges.
- Musty smells or spotting on ceilings.
- Frost in attics or wet insulation near penetrations.
- Peeling paint, swollen trim, or cupped wood floors.
Assessing your home: quick checks and tools
Moisture control in cold climates works best when you measure. You do not need fancy gear to start.
Use these tools:
- Hygrometer to track indoor relative humidity and temperature.
- Simple dew point calculator app to predict risk on cold days.
- Flashlight and mirror to check behind furniture and inside closets.
- Smoke pencil or incense stick to find air leaks on windy days.
Targets that keep you safe:
- Keep indoor RH around 30 to 40 percent at 68°F in winter.
- When the outdoor temperature is very low, reduce RH to prevent window ice.
A simple guide many pros use:
- 30 percent RH when it is 20°F outside.
- 25 percent RH when it is 0°F outside.
- 20 percent RH when it is below 0°F outside.
If you can, a blower door test and an infrared scan make hidden leaks obvious. These tests align with building science best practice and ventilation standards like ASHRAE 62.2.

Ventilation that works in winter
Moisture control in cold climates needs smart ventilation. You want to remove wet air without wasting heat.
Practical moves:
- Run bath fans during showers and for 20 minutes after. Use timers.
- Use a good range hood that vents outside. Run it when cooking with lids off.
- Consider a heat recovery ventilator or energy recovery ventilator. These exchange air while saving heat.
Helpful tips:
- Duct bath fans with short, smooth runs to the outside. No attic terminations.
- Clean fan covers and filters twice a year.
- Size HRVs by home area and occupancy. Many systems need balancing to work well.
In very cold regions, HRVs handle moisture better than ERVs. ERVs can be fine for tight homes if selected and set up with care.

Air sealing: the first line of defense
Moisture control in cold climates starts with air sealing. Air leaks pull moist air into places it should not go.
Seal these priority spots first:
- Attic bypasses around light fixtures, bath fans, and chimneys.
- Top plate gaps where wires and pipes pass through.
- Attic hatches and pull-down ladders with gaskets and weatherstripping.
- Rim joists in basements with foam and caulk.
- Boot-to-drywall gaps at ducts and plumbing penetrations.
Materials that work:
- High quality acrylic or silicone caulk for small gaps.
- One-part foam for medium gaps.
- Rigid foam plus sealant at rim joists.
- Gaskets for electrical boxes on exterior walls.
I often see huge gains from sealing just 10 to 20 key leaks. It is the best dollar spent on moisture control in cold climates and saves energy too.

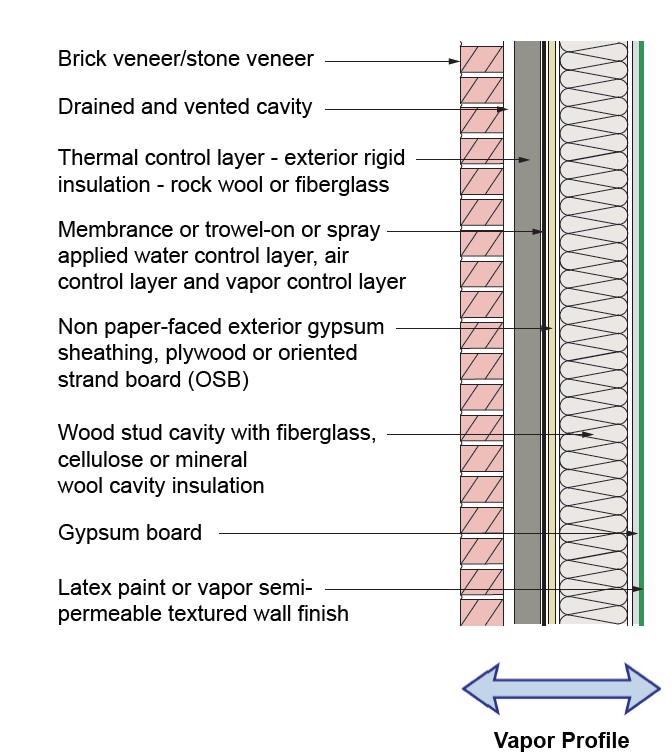
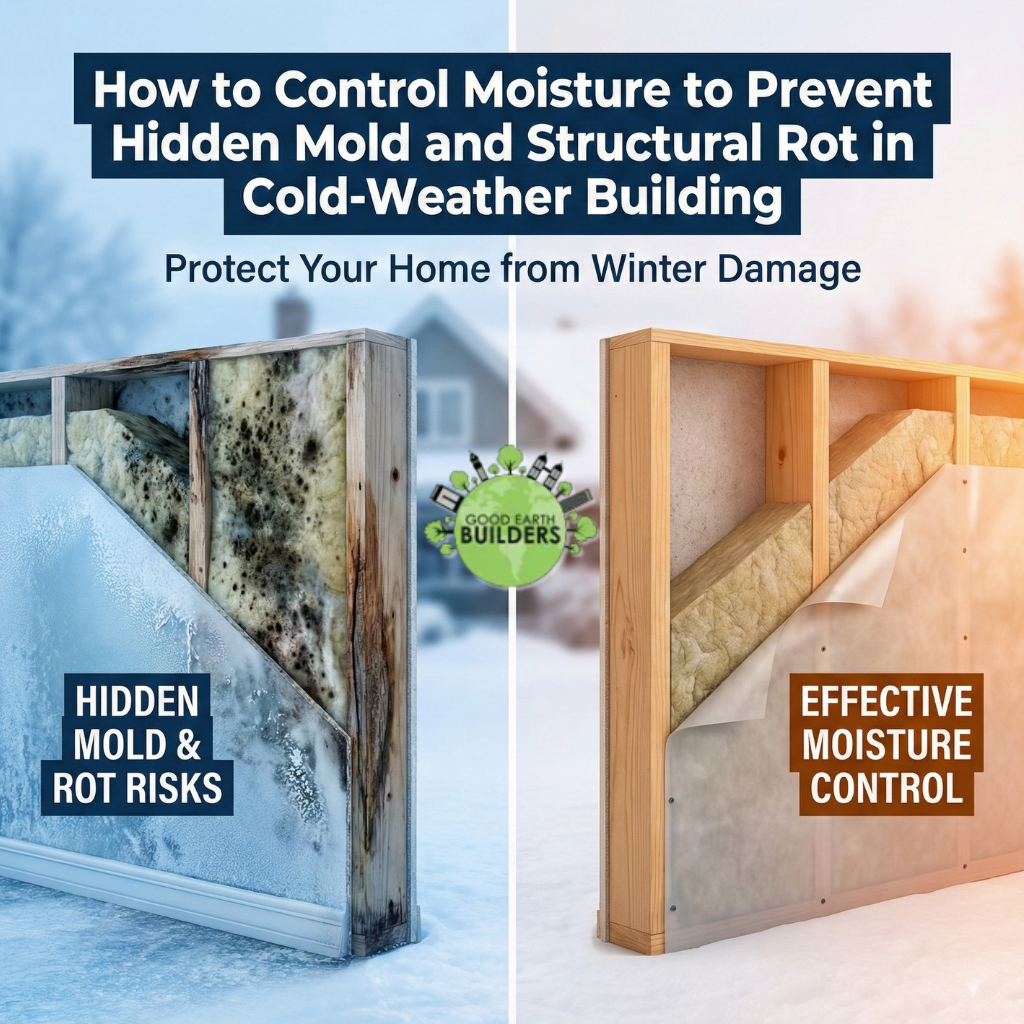
Insulation and vapor control layers done right
Moisture control in cold climates improves when insulation and vapor layers are in the right place. The warm-in-winter side needs the primary vapor retarder.
Core rules:
- In cold regions, place a Class II vapor retarder on the interior side of walls. Painted drywall with a proper coating often works.
- Use smart vapor retarders that tighten in winter and open in summer. They help assemblies dry both ways.
- Do not trap moisture with two strong vapor barriers. Avoid polyethylene on both sides.
- Exterior rigid foam warms the sheathing. This shifts dew point out and reduces risk.
Material basics:
- Class I is a true vapor barrier like polyethylene. Use with care.
- Class II is kraft-faced batts or certain paints.
- Class III is standard latex paint. Combine with exterior foam as per code.
Aim for continuous insulation and continuous air barrier. Gaps defeat both energy and moisture goals.
Managing basements, crawl spaces, and slabs
Moisture control in cold climates often fails from below. Cold ground and wet soil add water to air.
- Keep water out with gutters, downspouts, and graded soil sloping away.
- Seal cracks and joints. Use hydraulic cement where needed.
- Insulate and air seal rim joists.
- Run a dehumidifier in summer or when RH rises above 50 percent.
Crawl space best practices:
- Encapsulate with a sealed vapor barrier on the ground and walls.
- Seal vents. Condition or dehumidify the space.
- Insulate walls instead of the floor when possible for better control.
For slabs:
- Use under-slab vapor barrier and good perimeter drainage in new work.
- In older homes, add sealed flooring systems that can dry upward.
Windows, ice dams, and condensation
Moisture control in cold climates shows up on windows first. Glass is the coldest surface in the room.
Keep windows clear:
- Lower indoor RH on cold snaps per the outdoor temperature.
- Use continuous exhaust in bathrooms and kitchens.
- Leave blinds or curtains slightly open to allow air washing.
Ice dams form when warm air leaks into the attic and melts snow. The melt refreezes at the eaves.
Prevent ice dams:
- Air seal the attic plane first.
- Add even insulation to reach code levels.
- Ensure attic ventilation at soffits and ridge if the roof is vented.
- Keep ducts and can lights from warming the roof deck.
Upgrading to better windows helps, but air sealing and RH control come first.
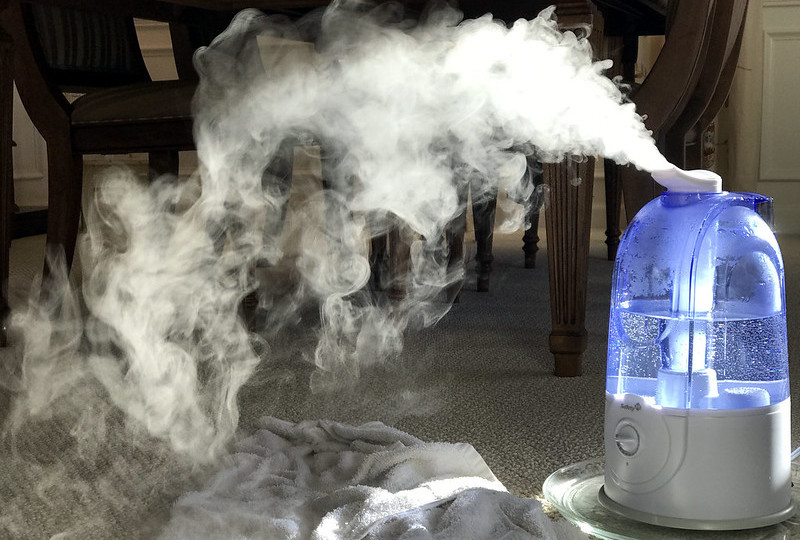
Heating, humidification, and dehumidification strategy
Moisture control in cold climates lives in the details of your HVAC.
Keep your balance:
- Do not over-humidify. Many central humidifiers run too high. Adjust setpoints with outdoor temperature.
- Use portable dehumidifiers in damp basements all year if needed.
- Keep filters clean so airflow and ventilation rates stay steady.
Choose smart settings:
- 68 to 70°F indoor temperature in winter feels fine when drafts are sealed.
- RH 30 to 40 percent is comfortable and safe for most cold days.
If you own an HRV or ERV, set it to run on a schedule. Boost it during showers and cooking.
Operation and maintenance checklist for winter months
Moisture control in cold climates improves with routine habits. Small steps add up.
Monthly tasks:
- Check indoor RH with a hygrometer in two rooms.
- Run bath fans during showers and for 20 minutes after.
- Inspect window corners for condensation and wipe dry if needed.
- Look in the attic on very cold mornings for frost or wet spots.
Seasonal tasks:
- Clean fan grilles and HRV or ERV filters.
- Test the range hood capture with a visible steam test.
- Check downspouts and extensions after heavy snow or thaw.
- Review humidifier settings when the temperature drops.
Yearly tasks:
- Schedule a blower door and IR scan after upgrades or new work.
- Re-seal attic hatches and touch up caulk at problem spots.
Real-world lessons from the field
I learned moisture control in cold climates through jobs that went sideways and then right. One home had perfect new insulation but terrible window ice. The fix was not new windows. It was sealing a dozen attic bypasses and lowering RH during cold snaps.
Another client stored a cord of firewood in the basement. Their dehumidifier never shut off. Moving the wood to the garage solved it in a week.
Mistakes to avoid:
- Adding plastic sheeting everywhere. It can trap water.
- Venting bath fans into the attic. That grows frost and mold.
- Ignoring the basement. Moisture often moves up from there.
- Over-humidifying to chase comfort. Seal drafts first instead.
Wins I trust:
- Air sealing at the top and bottom of the house.
- Smart vapor retarders in mixed-humidity seasons.
- Balanced ventilation with heat recovery.
Budget and ROI: what to do first
You can stage moisture control in cold climates to fit your budget. Start with steps that pay back fast.
High value, low cost:
- Hygrometer for each floor.
- Timers on bath fans.
- Caulk and foam for obvious gaps.
- Downspout extensions to carry water away.
Medium cost, big impact:
- Professional air sealing at the attic plane.
- Insulating and sealing rim joists.
- Upgrading bath fans and range hood.
Larger investments:
- HRV or ERV with proper ducts.
- Exterior insulation during re-siding.
- Basement or crawl space encapsulation.
Order matters. Seal first, then insulate, then ventilate. This sequence supports both comfort and durability.
Sustainability and health benefits
Moisture control in cold climates is not only about comfort. It protects your home and your lungs.
Benefits you can feel:
- Less mold risk and fewer musty rooms.
- Fewer dust mites when RH stays in the safe zone.
- More stable wood floors, trim, and furniture.
Energy gains:
- Air sealing reduces heat loss and drafts.
- HRVs bring in fresh air without big heat penalties.
- Dry materials insulate better than damp ones.
You protect your investment and breathe better air. That is a win across comfort, health, and cost.
Frequently Asked Questions of moisture control in cold climates
What indoor humidity is best in winter?
Aim for 30 to 40 percent RH at around 68°F. Lower it during extreme cold to avoid window ice and hidden condensation.
Do I need a vapor barrier on interior walls?
In most cold regions, use a Class II vapor retarder on the warm side. Smart vapor retarders offer more safety because they allow drying in summer.
Should I use an HRV or ERV in very cold weather?
HRVs are often better in very cold climates. Some ERVs work well if sized and balanced right, but they can retain moisture that you want to exhaust.
Why do my windows sweat even with new insulation?
Condensation happens when indoor RH is too high or air leaks cool the window frame. Lower RH on cold days and seal leaks around the window and in the attic.
How do I stop ice dams for good?
Air seal the attic, add even insulation, and ensure soffit and ridge ventilation if the roof is vented. Keep ducts and lights from heating the roof deck.
Is a whole-house humidifier a good idea in winter?
Use with care and adjust setpoints as outdoor temperatures drop. Many homes need less added moisture once air leaks are sealed.
Can plants or aquariums cause moisture issues?
Large collections can raise RH more than you expect. Track with a hygrometer and add ventilation if levels stay high.
Conclusion
Moisture control in cold climates is a simple idea with careful steps. Measure humidity, seal the big leaks, ventilate the wet rooms, and place vapor control where it belongs. Do these well, and winter problems fade while comfort and air quality rise.
Take the next step this week. Buy a hygrometer, set fan timers, and seal three obvious gaps. If you want deeper fixes, plan an HRV or a targeted air sealing job. Ready for more guides like this? Subscribe, ask a question, or share your biggest winter moisture challenge.